Computer vision is a mix of programming, modeling and mathematics and is sometimes difficult to grasp. Python is a language very commonly used for AI and machine learning, but it has some peculiarities that take getting used to. The OpenCV framework, which is the easiest way to start with computer vision, packs over 2800 algorithms and can be a bit overwhelming at first.
After going through these steps, you’ll be able to build apps like:
– An Image Classification – https://indiantechwarrior.com/all-about-tensorflow-resnet/
– An Image Segmentation – https://indiantechwarrior.com/tutorial-on-tensorflow-image-segmentation/
– A Object Detection – https://indiantechwarrior.com/building-faster-r-cnn-on-tensorflow/
This article will enable you to get started on building your own computer vision model with Python but if you want to build expertise on creating more such solutions then you can learn this in detail with Computer Vision Model with Python.
Let’s get started with the 6 Steps
Once you’ve done these six things, you should be able to confidently build basic computer vision models and move on to building your own AI applications:
- Understanding colour models and drawing figures on images using OpenCV
- Learning edge detection
- Learning contour detection
- Learn Convolution Layer
- Learn Pooling Layer
- Learn Tensorflow
In this article we’ll explain Step 1 which will give you a head start with OpenCV, rest are explained on below links
Edge detection is explained on following link https://indiantechwarrior.com/canny-edge-detection-for-image-processing/
Contour Detection is explained on following link https://indiantechwarrior.com/basics-of-contours-in-opencv/
Convolution Layer is explained on following link https://indiantechwarrior.com/convolution-layers-in-convolutional-neural-network/
Pooling Layer is explained on following link https://indiantechwarrior.com/tensorflow-pooling-layers-in-convolutional-neural-network/
Tesnorflow is explained on following link https://indiantechwarrior.com/tensorflow-constants-placeholders-and-variables-in-tf-1-x-and-tf-2-x/
Brief Definitions
Let’s start with definitions to get us on the same page.
What is computer vision?
Computer vision is a field of deep learning that enables machines to see, identify and process images like humans. It is the automated extraction of information from images━anything from 3D models, camera position, object detection and recognition to grouping and searching image content.
What is Python?
Python is the language most commonly used today to build and train computer vision models. Python was designed to be easy to use and quick to learn, has an accessible syntax and offers many frameworks and libraries available for machine and deep learning, including NumPy, scikit-learn, OpenCV and deep learning frameworks like TensorFlow and PyTorch.
Installing OpenCV
Here’s how to install OpenCV:
pip install opencv-python==3.4.2
pip install opencv-contrib-python==3.3.1
After you finish the installation, try importing the package in your Python code. If you manage to run the code without an error, you’re good to go.
import cv2
 cv2.__version__
For more details, see the official documentation.
Step 1: Understanding Color Models and Drawing Figures on Images
It’s important to understand color models and how to transform images between them. Different color models may be more appropriate for different computer vision problems. You should convert your source images into the color model that will make it easiest for the model to identify the required elements in the image.
A color model is used to create a system of all possible colors using several primary colors. There are two types of models:
Additive models use light to represent colors in computer screens. The primary colors in an additive model are red, green and blue (RGB). Here is how to convert an image from BGR (the default model in OpenCV) to RGB:
img_rgb = cv2.cvtColor(img, cv2.COLOR_BGR2RGB)
 plt.imshow(img_rgb)
Subtractive models use ink to print colors on paper. The primary colors they use are cyan, magenta, yellow and black (CMYK).use light to represent colors in computer screens. The primary colors in an additive model are red, green and blue (RGB). Here is how to convert an image from BGR (the default model in OpenCV) to RGB.
Computer vision uses three main color models:
A grayscale model represents images by the intensity of black and white. It has only one color channel. Here is how to convert an image to grayscale in OpenCV:
img_gray = cv2.cvtColor(img, cv2.COLOR_BGR2GRAY)
 plt.imshow(img_gray, cmap = 'gray')
HSV stands for hue, saturation and value. Here the focus is the value of colors.
HSL stands for hue, saturation and lightness. Here the focus is the amount of light. Here is how to convert an image to HSV and HSL
img_hsv = cv2.cvtColor(img, cv2.COLOR_BGR2HSV)
 img_hls = cv2.cvtColor(img, cv2.COLOR_BGR2HLS)
Another important skill is drawing things on your source images. This is often required in computer vision, for example to visualize the bounding boxes of objects you detect in your image.
How to draw a rectangle on an image in OpenCV
First load the image, then use the cv2.rectangle() function to set the two corners that define the rectangle.

import cv2
import matplotlib.pyplot as plt
image = cv2.imread('robot.jpg')

imageRect = image.copy()

start_point =(200,50) # x1, y1
end_point =(350,100)   # x2, y2

cv2.rectangle(imageRect, start_point, end_point, (0, 0, 255), thickness= 3)
cv2.imwrite("image5.jpg",imageRect )
img = cv2.cvtColor(imageRect, cv2.COLOR_BGR2RGB)
plt.subplot(111),plt.imshow(img),plt.title('Draw Rectangle')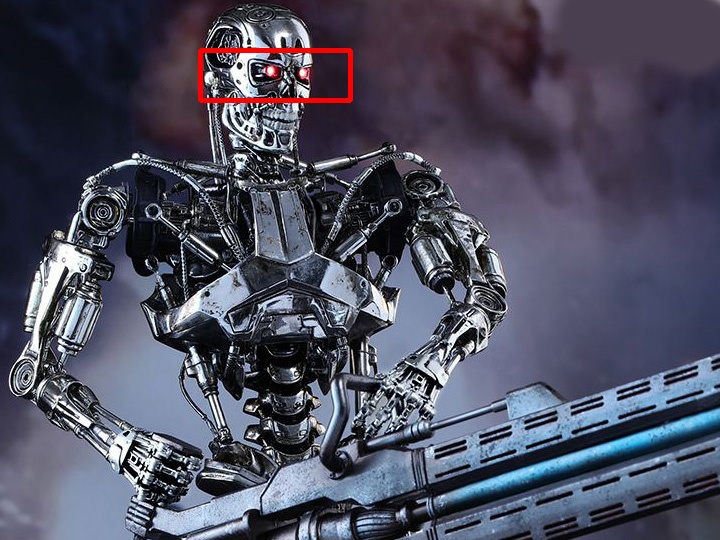
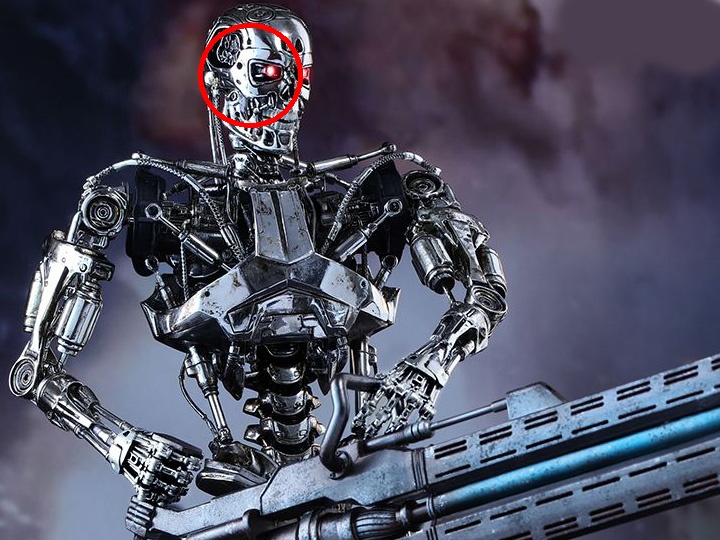
How to draw a circle on an image in OpenCV
First load the image, then use the cv2.circle() function to draw circle
circle(image, center_coordinates, radius, color, thickness)
image = cv2.imread('robot.jpg')
imageCircle = image.copy()
circle_center = (250,75) # x1, y1
radius =50
cv2.circle(imageCircle, circle_center, radius, (0, 0, 255), thickness=3)
cv2.imwrite("image5.jpg",imageCircle )
img = cv2.cvtColor(imageCircle, cv2.COLOR_BGR2RGB)
plt.subplot(111),plt.imshow(img),plt.title('Draw Circle')
How to draw an object interactively on an image
First you need to define a callback function, which returns data for the cursor position when you click the mouse.
import cv2
import numpy as np
def draw_circle(event,x,y,flags,param):
    if event ==cv2.EVENT_LBUTTONDOWN:
        cv2.circle(img,(x,y),50,(0,255,0),-1)
    elif event==cv2.EVENT_RBUTTONDOWN:
        cv2.circle(img,(x,y),50,(255,0,0),-1)

Next, call the window. The cv2.setMouseCallback() makes the connection between the window and the function you defined above:
cv2.namedWindow(winname='my_drawing')
cv2.setMouseCallback('my_drawing',draw_circle)
img = cv2.imread('robot.jpg')Finally, execute the window as follows:
while True:
        cv2.imshow('my_drawing',img)
        if cv2.waitKey(20) & 0xFF == 27:
            break
cv2.destroyAllWindows()
That’s it! You’ve made your first steps in OpenCV and are able to perform basic operations with images.


